Monday, December 6, 2010

Wallpapers

Well Playing around at halloween time and just a few days ago I made some wallapapers and would love to share them :)

I hope that you all enjoy them I will post both here and the sizes are 1024x647 and 1280x800


again I hope u all enjoy them :) they are linked to my fotki were u can find them :) please let me know here what u think of them :)

Sunday, September 5, 2010

Garv Chic Blue


This tut was writen by me on September 5th , 2010 with a working knowledge of psp.

Supply Needed:
Tube of choice I am using the wonderful work of Keith Garvey which u can get HERE
Scrap Kit Chic Blue by Donna's Designz which u can get HERE
Mask of choice or u can use the one I did which u can get HERE

Now lets get started :)

Open up all supplies
Open new image 500x500 flood fill white
New raster layer select all open paper 23 and copy and paste into new image.
Select none.
Layers new mask from image and select your mask.
Merdge group
Open frame 4 and resize 70% sharpen if need be , Move to the top right.
now take your magick wand and click inside the frame.
Open your tube and click on the close up with mover tool and paste as new layer resize 60% and center the face now go to selections invert and hit delet on your keyboard select none and move below your frame,
click frame layer and merdge down.
Now open up element heart chain 02 and resize 60% and move to bottom center of the frame.
Now back to your tube click on full girl and copy and paste as new layer in our tag.
Resize her 90%. position were u like.
Add drop shadow of choice to Tube, frame and heart.
Add copyright and name and your done :)

Thanks so much for looking and trying this tut.

Tuesday, August 17, 2010

Brown Frame Garv


This tut was writin by Nickys Designz (me) on Aug 17th, 2010.
This tut was writtin with a working knowledge of PSP.

Supply u will need:
Font of choice( I am using IncisedBlackWide)
Tube of choice, I am using the wonderful work of Keith Garvey which u can buy here at HERE.
Frame and Mask included HERE.
Plug in EyeCandy4 Gardnet Glow


OK lets get started :)

Open your supplys and tube of choice.

Make new image 500x500 transparent
Flood fill white
new raster layer
flood fill dark brown
new mask layer from image and in your pull down menue select your mask apply/ok
Merge Group.
Copy and paste your frame as new layer.
Copy your mask layer u merdged and close that layer on your pallate.
Click your frame layer make sure its your active layer
take your magic wand and click inside your frame
Paste your mask layer now as new layer.
Selection, Invert, Delet, Select None.
Move down to under the frame.
now make your frame active layer again
Click inside it with your magic wand
click your move tool and copy and paste your tube and reside if need be
Move tube so it looks good inside the frame
Selection, Invert, Delet, Select None
Move your tube layter below your frame
Add drop shadow of choice to your tube and frame
Add your copyright info
add name and add gardenet glow white 4.00 to your name part and save as JPG and your done :)

Thanks for looking and trying please feel free to share your work with me :)

Sunday, July 18, 2010

First Word Art KIDS

I just made my first word art :)

Heres preivew of it :)

Its in titled KIDS


TOU Personal Use Only
Its ok to share but try to link back and leave copyright intact.

Download HERE

thanks and enjoy

Monday, June 21, 2010

Happy 4th of July (ac)


This tut was writen by Me , Nicky, on June 21st 2010.
Writin with a working knowlage of PSP.
Writen using PSP 9


Supply:
Tube of choice- I am using the wonderful work on Ismael Rac which u must pay to use
Font of choice - I am using the font called Star Dust
BabyV's StarsnStrips Kit found at Mischief Scraps its a PTU kit
Drop Shadow

Ok lets get started shall we

First thing open ur tube of choice
Open your scrap kit and have out the following items:
BabyV's Starsnstripstag1
flower1
flower4
flower2
string2

Now open new image 500x500 transparent
pull up tag1 and with your magic wand click the center of it
Now take your tube of choice and copy it
Paste as new layer and click your mover tool
Resize about 45% and then move it where u like and go to Selections Invert hit Delet on your keyboard then selctions select none.
right click on layer and merdge visable.
Copy your merdged image and paste as new layer in ur blank tag.
place it as u like and add drop shadow of your choice.
now pick one of your 3 flowers and copy and paste.
Resize 60% place where u like, I did it in bottom left corner.
Take a second flower and copy and paste and resize this one 50%
place it ontop of first flower.
Take ur final flower and copy and paste and resize 45% and place on top of the other two.
Merdge down ur flowers so all 3 are now one.
Add your drop shadow.
Copy your string now and paste into ur tag.
Resize 45% and place it off to the right side of tag and add drop shadow.

Now add your copyright and Name and your done :)

I would love to see any and all tags u make using this tut so please feel free to contact me with them :)

Hugs
Nicky

Friday, June 4, 2010

Stars And Stripes

heres my newest temp called Stars and Stripes. 

TOU :  Personal Use Only.
Link back to me if used in tut


I hope u all enjoy below is the prevew and below that is the link to download :)


Download HERE

Thanks for looking :)

Thursday, May 27, 2010

Template #3 Hearts

Heres the 3rd Template I have made called Hearts Personal Use only and click the link below preview to download :)


Wednesday, May 26, 2010

Sunflowers


This tut was writen with a working knowladge of PSP
Writin by Nicky on May 26th, 2010

Supplys:

Sunflower Patch Scrap kit by Bits N Bobs found HERE

Tube of choice I am using the work of Jessica Dougherty which u must buy. You can find it HERE.

Font of choice I am using one called Sunflowers.

Ok lets get started :)

First open a blank image 700x300 (or what ever size u want)

Select all and copy from your scrap kit paper 10 and Paste INTO selection
Control D or selcet none.

New raster layer selcet all copy from ur kit SP-63 and paste INTO selcetion
control d or select none.

next copy SP-16 your green bow and resize 60 and copy and paste and move to the left side of your tag.

Copy and paste SP-48 (No resize) and move below your bow layer and move under your bow on the left.

Highlight or make your bow your active layer and merdge down.

go to layers and duplicate and then Image and mirror.

Add any drop shadow you like to them both.

Next add your tube resize 60% position toward the center a little and add drop shadow if u like.

Add your copyright info and name and your done :)

Hope you enjoyed :)

Thursday, May 20, 2010

May-Hem TUT


This tut was writen on May 19th
writen with a working knowlege of PSP

Supply:  Templete by Donna's Designs which u can get HERE
Tubes of choice I used the work of Ismael Rac which u can get HERE
Scrap Kit is May-Hem by Bits and Bobs and can be found HERE
Font of your choice

Now lests get started:

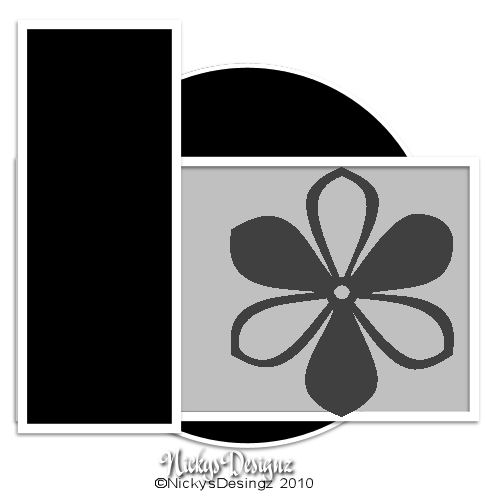
open up your templete and delet the copyright
Open up the scrap kit and get out Papers 1, 7 and 8 and element 83

Take your mover tool and on the templete select raster 5 and take your magic wand tool and click inside that raster.

Open Paper 1 and copy.  Back to templete and Paste as new layer.
Selcetions Invert and Delet and Select None.

Mover tool select raster 8 and take your magic wand again and click inside the raster.
Copy paper 8 and paste as new layer Invert delet and selcet none.

Mover tool again :)

Select Copy(2) of Raster 10 click it again with your magic wand. 
Open paper 7 Copy and Paste in tempelet as new layer and invert and delet and select none.
do the same for Copy of Raster 10 and Raster 10. 

Now select raster 6 and flood fill with a ligh pinkish or purple color.
Select Raster 7 and flood fill black.

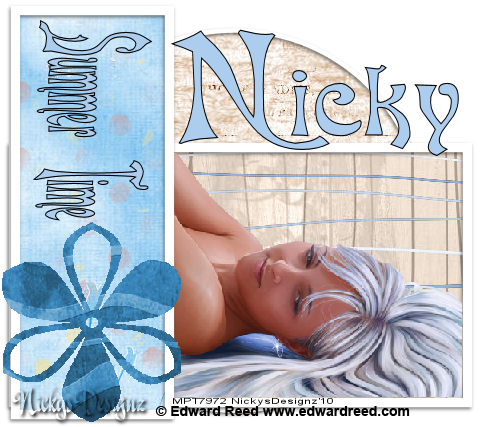
Now Make a new image 500x500

Copy and paste raster 4 into new image and flood fill white.

Copy and paste raster 9 and resize 70% copy the frame that was around it and do the same Merdge down so that they are one.

Move to the right side of tag.

Do the same for Raster 3 and the frame around it and place it toward the right.

Now u will take Element 83 and resize 70% and move to the left.

Now copy the cirlcles from the templete and resize them also 70% and do the same for the frames around them.  Place them on the left of the circle. 

Take your magic wand and click inside the frame of a circle and paste one tube u picked up and Paste into selcetion. do the same for the other two but with diff tubes.

Take your move tool and click your big circle and paste your 4th tube as new layer and resize 80% and move it how u like. Take your eraser tool and remove any parts hanging over the bottom of the circle.

Add copyright and words and save as PNG.

THE END

I hope u all enjoy and let me know how it turns out for u :)

Hugs
Nicky


Monday, May 17, 2010

Music Templete

Well I made another new templete called Music.  I just hope u all enjoy using it :)

My TOU are simple if u use in a tut please link to my blog :)  Leave file name intact please. 

Below is preview of it and click link below preview to download. Thanks so much and show me what u do with it :)


Monday, May 10, 2010

New Templete

Well I made my first ever Templete and am offering it here on my blog :)

Below is preview of it and a tag I did using it followed by the link to download it :)

Preview


Tag I did with it


Link for dowload can be found HERE

Enjoy and have fun :)

Wednesday, April 21, 2010

Spring Fantasy


This tut was writen by Me (Nicky) On April 20th 2010.
Writen with working knowlege of PSP.

Supplie-
PSP (any version will do. I am using psp9) 
Tube of your choice I am using the work of Caron Vinson you can by HERE.
Scrap Kit by Bits N Bobs called Kiwi Fantasy which u can buy HERE.
Font I used is FairydustB which u can find HERE

Ok lets get started

ok first thing open up your scrap kit and get paper 6 out as well as elements 71,72, and 73.

Next open up your tube of choice.

Open up new image 500 x 500 res 72.00 transparent

go to your paper and copy it.

back to your new image and go to selections select all (or ctrl a) and paste into selection (ctrl+shift+L) select none(ctrlD).

next u will take element 71 and resize 80%  copy and paste as new layer.  Mirror it and move it to the top right corner.

Next take element 72 and 73 and repeat what u did but place them so they overlap and you can still see the previouse one below it.

Next you will add your tube and resize 90% if needed.
Place her to the left on the tag and add drop shadow of your choice.

Add your copyright info and text and save as JPG and your done.

If you try this tut please feel free to show me how u did :)

Love and light,
Nicky

Monday, March 15, 2010

Keith Garvey Happy Easter Tut


This tut was wrten on March 15th , 2010
Written by Nickys Designz
With a working knowlege of PSP

Supply: 
Tube of your choice (I used the wonderful work of Keith Garvey which u must have a pay to use which u can get HERE)
Font Easter Fun by Tom which u can get HERE
*Frame
*Paper
*Word Art
*included in zip file found HERE

Ok lets get started :)

First unzip supply
have ur font ready
open up your tube

Open new image 500x500 72.00 resolution raster background transparent
Pull up your frame and copy it
Paste as new layer and add drop shawdow of your choice and move to the right side some
Take your magic wand and click inside the frame
Open and copy your paper
Paste as new layer above the frame
go to selections invert and hit Delet on your keyboard
move the paper below the frame 
make the fame active layer again
Open your tube and copy
Paste INTO selection and control D or selection select none and add drop shadow
click your mover tool
Open word art and copy
Paste as new layer
Move where u like it or put it like I have mine and add drop shadow
Add copyright info
Add text and save as PNG and your done :)

I hope u enjoy and feel free to email me your results


Thursday, March 4, 2010

Just Breath TUT


This Tut was written by me (Nicky) On March 4Th 2010
Done with a working knowledge of psp
I used PSP 9 to make this tag
Supplies needed:
Font of your choice (I used a font called Grafik Text)
Tube of your Choice (I used the wonderful work of Kieth Garvey you need a licence to use his work and can get one at .)
plug in Gardent Glow
Paper*
Word art*
*Provided for you HERE

Ok lets get started :)

unzip and open your supply and have them ready as well as your tube.

Open a new image 500x500 72 resolution transparent

Open and copy your paper

on your new image click on layers select select all and paste paper into selection and click selection select none.

Open your word art and resize 50% and add it to your image.

Move it to top left or where u would like it and add gardgent glow white 3.00

Now open the tube you picked and copy it and paste into the new image and resize as needed and add drop shadow and place where u like.

Next add copyright info for artist and your text and save as JPG and your done :)

I would love to see your results so feel free to email me them :)

Hugs
Nicky

Wednesday, March 3, 2010

Missing You tut


Tut written by Me (Nicky) on March 3rd , 2010
elements used by me not made by me.
This is a original tut and any duplication is coincidence.

Written with a working knowledge of PSP
I used PSP9 but u can use other versions.
art work by Keith Garvey, you must have a licence to use his artwork. You can get one at HERE.

Supplies Needed are
Font of your choice, I used a font called BlackChancery
plug in Gardent Glow
Paper1
Bow1
Tube of your choice
Mask

download all supply HERE.

Ok Lets get started

Open your supply and have them ready.

Open new image 500x500 72 resolution transparent.

Floodfill with a dark blue color.

Layers new raster layer, selection select all copy paper1 and paste into layer select none.

Layers new mask layer from image and select your mask from the drop down menu and click ok.

merdge group and x the first layer, the dark blue.

make sure your active layer is the group layer.

Copy the frame and paste as new layer and resize 50% and center it and add drop shadow.

Now take your magic wand and click inside your frame. Copy your tube and paste as new layer and move it where u like and move below the frame.

Next u will make go to selcetions invert and hit delet on your keyboard. Your tube will still be were u placed it but all extra parts will now be removed. Selection select none.

Add drop shadow to tube.

make the frame active layer again and copy and paste your bow. Move bow to the bottom of frame. Add drop shadow.

Now u add copyright info and text (add gardent glow black 6.77 to text) and save as PNG and your done :)

I would love to see your results so feel free to email them to me :) lady_white_wolfs@hotmail.com

I hope u enjoyed this tut as its my first :)

Nicky