A lil Goth
a tut by NickysDesignz
I wrote this using paintshop pro 9.
I used the wonderful work of MellieBeans who you can find her wonderful kit called A Lil Goth HERE. Below is a preview of the wonderful kit :)
I used the font called Dearest which u can download HERE
I used the art work of Keith Garvey which you have to pay to use.
You can purchase his work HERE.
OK lets get started :)
SUPPLY: PSP
Kit
Tube(s)
Font
Gardent Glow (Eye Candy 4)
Mask (you can get it HERE)
Now open your font, kit and tube(s) and Mask.
Open a new image size 600x550 Pixles,
Res 72.000 , Raster background, transparent.
Go to Selection Select All
On your kit open Paper11 and go to edit and go to copy.
Back over to your blank image you want to go to edit Paste Paste into selection. Then go to Selections and select none.
Open paper 01 and edit copy. Go to your new image and go to layers new raster layer. Go to Selection Select All and then edit paste and paste into selection and Select none.
Open your mask and go to your new image and go to layeres, New Mask layer from image. Go to Layers, Merge, Merge Group.
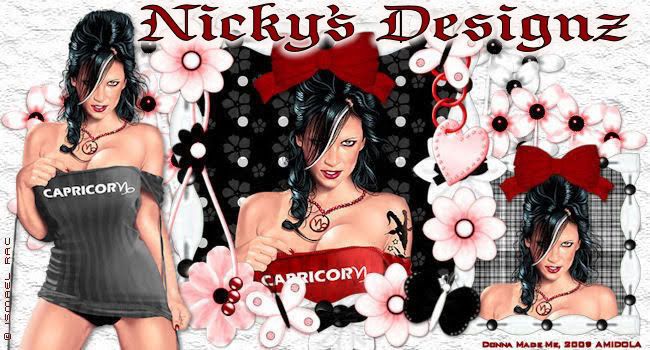
Open Element e02 edit copy and back over to your new image and paste as new layer and move to the left corner of the image like I have.
Open Element e01 and copy it by going to edit copy. Open your new image your working on and paste as new layer by going to edit paste paste as new layer. Resize by going to Image and resize 70% and center it. Go to Adjust Sharpen and Sharpen.
Open element el49 and copy and paste as new layer in your image. Resize 24% and move to the right.
Open element e10. Image resize resize 51% and move to bottom and over a little. Make sure the white rose is over the el49.
Open Frame FR02 and copy it and paste as new layer in your new image and resize 33% go to adjust and sharpen and sharpen. Move it to the right and up a bit.
Take your magic wand tool and click inside the frame.
Open your tube, if it has close up layer click that layer and copy it. Paste as new layer. Resize 38% and with your move tool move it so its where u like in the frame.
Then go to selection, invert, hit delete on your keyboard and go back to selection and select none. Go to adjust Sharpen and sharpen.
Move the tube below the frame layer. Click the frame layer and
go to Effects 3d effects Drop Shadow ( color white, V=1 H=1 O=100 Blur=5.00 ). Merge frame down by going to Layers Merge Merge down.
Open element E32 and copy and paste as new layer in your image. move to the bottom.
Open Element el08 and copy and paste as new layer in your image and move to the right and down a little so it doesnt block your frame.
Open your tube and copy it and paste as new layer. Resize the tube by going to image and resize and resize 90% and move to the left side of the image. Sharpen.
Add your copyright and Name.
If using dark color you can use your gardent glow.
Convert your text to raster layer by right clicking on it on your layer pallet on the right and convert to raster.
For copyrights if u are like me and used black color you want white glow.
Go to Effects , Plug Ins Eyecandy 4 Gardent Glow.
Glow Width 4.50, Soft Corners 25, overall 100. Click the tab that says Color and click white if you have it as one of the two colors if not click the eyedropper tool and click a white area. Click OK.
For name you can use black for the glow if u use pink like me. You do what u just did only instead of white u will choose black.
Save and you are done :)
Thank you so much for checking out my tutorial and I cant wait to see what you come up with :)









No comments:
Post a Comment